
Instructions for running E-MU 1212m PCI in Windows 10 with any update

The vast majority of users of E-MU products, once acquainted with their products, decided for themselves that they would use them until they find something better or until the product fails. The reason for such sympathy is very simple and it lies in the exceptionally good quality of playback and recording on E-MU sound cards. Despite some compatibility issues with old motherboards and the last driver update date - May 2011, E-MU sound cards continue to be popular and delight their owners.
But, unfortunately, May 19, 2019. update 1903 was released and the E-MU 1212m/ E-MU 1616m cards stopped working, with the following announcement when starting the PatchMix shell:

You don`t appear to
have sufficient E-MU hardware to load the session in your system.
This may be because
the session expects more E-MU hardware than what you have
installed on your system
Do not be upset - there is a solution to this problem and step-by-step instructions for fixing it, see below:
First of all, it should be noted that the method was tested only on those versions of drivers and PatchMix that will be available for download in your account after purchasing the E-MU 1212m PCI card in our Kit-Amp.com store. This will give you access to the following files:
1. «Driver E-MU»
2. «PatchMix E-MU»
3. «Driver X-Fi»
All files are compressed into a ZIP archive and need to be unpacked.
"Driver E-MU" and "PatchMix E-MU" are installed in the standard way - by clicking on them. “Driver X-Fi” (exe file) must be unpacked again into a previously created folder, for example Driver X-Fi, after which we will see the following files in this folder:

Operation of the E-MU 1212m/ E-MU 1616m with other driver versions and PatchMix has not been tested and is not guaranteed.
1. It follows that the first thing to do is to remove the installed driver and PatchMix.

2. Install "Driver E-MU" - reboot.
3. Install "PatchMix -E-MU" - reboot.
4. Find the E-MU E-DSP Audio Processor (WDM) in Device Manager and right-click on "Update Driver"

5. Select "Find driver software on this computer"

6. Select "Select a driver from a list of available drivers on your computer"

7. Select "Install from disk"

And specify the path to the unpacked files earlier \Driver X-Fi\Drivers\wdm
8. Choose a file «wdma_emu.inf»
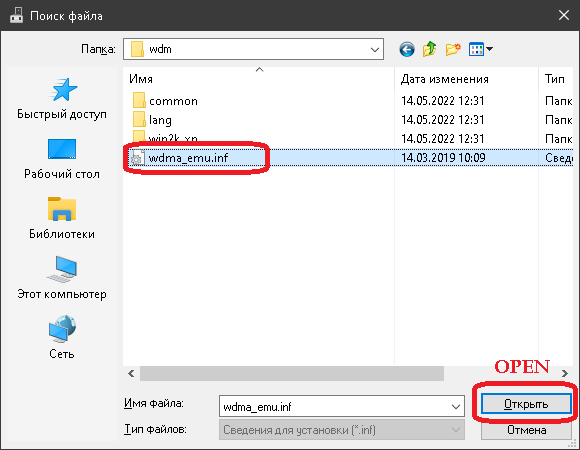
и нажимаем «Открыть»
9. Choose a driver “Creative X-Fi Audio Processor (VDM)»

and click "Next", after which the system will issue a warning that the installation of this driver is not recommended. Click continue "Yes"

10. After installing the driver, the system will report a successful installation

11. Restart your computer
After restarting the computer, in the device manager, our card will be displayed as "Creative X-Fi Audio Processor (WDM) - this is normal and does not affect the operation of the card in any way

The operation of the card was checked in the usual mode:

So in ASIO mode:

The card works again and continues to delight with its great sound!!
Related Products

E-MU 1212m PCI
The apotheosis and the swan song at the same time, the E-MU company in the products of the E-MU1212mPCI / E-MU1616m line. Almost all products of this manufacturer are ahead of their time by at least 1..
4980.00грн.